A couple of comments on a few of the Battlestar Galactica related posts brought up an “issue” with the Cortex system — that the Cortex system is not really set up for simulation-style combat. I see this as a feature of the more story-oriented focus of the Serenity and BSG settings, but it is certainly a legitimate complaint if you are looking for a lot more viper on raider action, rather than talking about our feelings action.
So I thought I’d expand on some of my “fast and dirty” fleet-scale rules.
ON THE FIELD OF BATTLE
The Battlestar Galactica game lends itself naturally to mass combat — be it fights between hundreds of fighters, multiple capital ships banging away on each other, or large numbers of resistance fighters battling the toasters on the Twelve Colonies after the Fall. (It would equally well for doing some flashbacks of the Unification War, if you are playing Serenity…)
These large set pieces can be settled several ways to lend that element of randomness that can lead to surprises in your game.
THE EASY WAY…
The leadership of the combat groups can run a straight test against each other to see if they meet a specific goal, like “capture the high ground”, “push the Cylons back to liberate the Farm”, or “destroy or rout the resistance group.”
In this case, you could have the respective commanders roll a test like ALERTNESS or INTELLIGENCE+PERCEPTION/TACTICS versus each other to succeed and hand wave the number of losses. This removes the tendency for GM fiat, and can give the players some kind of input on how things play out.
However, if your players aren’t in the upper echelons of command, you might want to give them a bit more influence on events…
Zoom In, Zoom Out
One way to address the various scales of combat is to focus on a select mission or task that is essential to the goal. Maybe you’re a rifle team on Omaha Beach and you need to hit that machinegun emplacement to allow the rest of the Allied landing parties to get ashore in one piece. You play out that mission, then any success might give bonus shifts for the overall conflict.
Say your group is fighting to clear an area of a basestar group over a planet. You might have the initial TACTICS test to by the commander of your battle group set up initiative and give a bonus for the first actions.
You zoom into the squadron or player-level fight between the vipers and raiders to see how they are doing in their goals. Then you zoom into a particular dogfight, or maybe it’s an electronic warfare mission by raptors to jam Cylon transmissions. You play out those low-echelon character’s actions, then if they succeed/fail, have some kind of consequence. Maybe the EW mission jams the Cylon missiles (use as the defense test for the battlestar against being hit); maybe the vipers were flanked and get to launch an attack on your battlestar.
Then zoom back out as the fight unfolds and apply shifts to the actions of the characters to the TACTICs or other tests of the leadership.
Cortex uses “scales” to address the differences between a player character, or a vehicle, or a massive spacecraft. These scales are PERSONAL, LARGE (Planetcraft in BSG), and MASSIVE (Spacecraft in BSG). Each represents a 10x difference in power. For example, a character attacks a raider with personal scale weaponry. Only with a damage of 10 would they have any effect, and that would be a 1 to the raider.
For mass combat, these also apply in time. In MASSIVE scale combat between capital ships, each round is about 10 minutes. For planetcraft, it’s about a minute/round. For personal, it’s roughly 6 seconds. This may seem short, but many modern naval battles between fleets have taken place in the space of an hour.
You can zoom in and out of the fight from capital level, into a personal dogfight or task, then back out to the squadrons duking it out. There are roughly 10 actions for the character in each squadron-level fight, 10 in each capital ship fight. (I typically truncate squadron to capital fights to three rounds for the fighters to each round of big ship action.
ADDING “CRUNCH”
Gaining Initiative
The commanders of both sides roll an ALERTNESS or INTELLIGENCE+PERCEPTION/TACTICS contest to determine initiative. With a successful test, they can lend a die shift up for one of their subordinate units’ test — a gunnery shot, a squadron/group conflict between fighters; on the ground, this could be given to an artillery battery, or a tank platoon, or even an individual character.
Size Matters…Zoom Out, Stay Out
One issue with a large-scale fight is that addressing every single fighter would take a sizable number of sessions to play out, and would lose the dramatic impact. (Think about the fights in Battlestar Galactica, they don’t show a whole battle — usually, the dramatic highlights are shown and the fight is over in a matter of minutes.)
To get around this problem, there are a few things you can do.
Option 1: Have the CAG or leader of the fighter flight/squadron/group test against a Cylon raider — AGILITY+PILOT vs. the Raider’s stats and use that as an overall indication of how well the fighters are doing. It also, by extension, give you an idea of how good the player character is doing.
The number they succeed by is the number of raiders that have been damaged/splashed by the vipers. The raiders, then get their chance to hit the vipers, same roll, same effect. It gets you a quick and dirty idea of how things are going in the fight without knowing it was poor Jo-Jo that caught a packet. The downside is it does not take into account disparate numbers of force. I like this for quick fights of small, relatively evenly matched groups.
Our vipers are usually up against anywhere from 3-1 to 6-1 odds against them…this first suggestion tends to favor the small group, especially if they are led by a PC who can throw plot points around.
Option 2: Enter scale again. A planetcraft/large-scale vehicle like a viper can attack a basestar, but they need to score 10W to do any real damage. Let’s assume that to achieve that kind of hit would take several vipers, so let’s assume (and admittedly, we’re rounding down heavily) that a flight of vipers could probably hit with the equivalent of a d2W in spacecraft or massive scale.
So using that as a baseline, let’s break down the size of various units for a quick and dirty idea of what kind of damage they can dole out, and what they can take (using the 10x scaling, a viper can take 1.4 points of damage. We’ll round that down if you want to play this dark and gritty, or 2/bird if you are playing more cinematic-style.)
For the sake of simplicity, you can assume that a unit retains it’s abilities until 1/2 their life points are taken, then they have the usual two step down presented in the rules. At 0 life points, the unit is rendered ineffective or destroyed (depending on the style of play.)
Typical unit sizes follow (based roughly on US Naval standards and what we’ve seen in the show.)
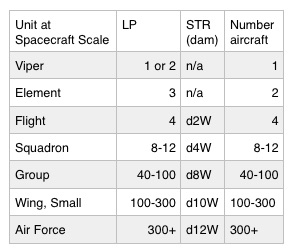
One reason for using the spacecraft scale is to allow planetcraft to assault large targets and vice versa, and also brings the time and damage scales of fighters in line with the capital ships.
Example: A wing of raiders is lunched from the basestar and quickly aproach Galactica, the raiders break into several groups to attack the vipers screen — a groups’ worth (100), with three other groups going after respectively, 1) the civilian ships, 2) Galactica, and 3) acting as a defensive shield for the basestar.
Galactica is banging away on the basestar, but also has their point defense system firing on the raiders and their missiles. The PDS can be used as a defensive roll against the raiders’ attack roll, or they can attempt to destroy any raiders that breach it. (Due to the planetcraft scale, and the large number of PDS batteries, you don’t get a damage die, but you hit them at spacecraft scale with all Basic damage translated to Wound.)
Galactica’s weak air group (40) vs the raiders have equivalent life points and STR, and resolve the fight from the CAG’s tests (or the PC, if they aren’t the CAG…why? Because you’re in the credits.)
Now, if you want to give the PCs a bigger slice of the action, you could zoom in and break it down into the squadron they command, or even a single dogflight.
Remember that at 1/2LP, the unit loses -2 shifts to their strength (at d0W, they can only do 1W of damage to their target, no matter their success.)
MEANWHILE, ON THE SURFACE…
These rules can be applied to the surface, as well.
Infantry vs. Armor
One issue to content with is scale, again…infantry or characters are personal scale, but can gain access to planetcraft/large scale weapons like shoulder-fired missiles, satchel charges and IEDs, or anti-materiel rifles.
While you should resolve character actions by zooming in on their efforts, the general scale of the battle is set by the scale of the units involved.
Echelons
Echelon refers to a formation or the level (scale) of troops involved in a fight. Personal level fights are conducted by the PCs and perhaps up to a half dozen NPC. Anything larger than that is
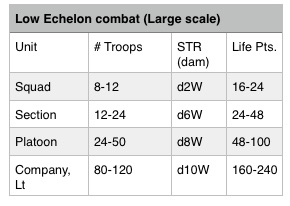
But really large battles, need a bigger scale:

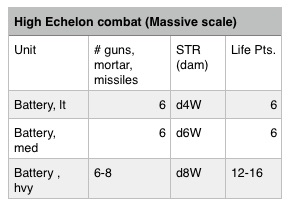
Massed artillery exchanges with vehicle or personnel should be conducted at the Massive scale, due to the amount of firepower being talked about.
Low echeon battles take place over the space of minutes to an hour — each round of combat is the equivalent of 10 personal scale action rounds, or about a minute. High echelon rounds take place about 10 minutes/round. Keep in mind that high echeon battles have frequent periods of maneuvering or regrouping, that can be added into the overall length of the battle.
DAMAGE REPORT
The original rules were not designed to address how damage could effect the performance of a vessel. To give players a bit more “crunch” and provide more flavor here is an alternate, expanded system for damage and repairs. There’s nothing that says the GM has to roll on these tables or use the ideas, but they can provide some guidance for how damage could be handled in a space battle.
Instead of suffering effects at 1/2 the life points of the craft, damage begins to pick away at a ship or vehicle at 1/4 the damage, 1/2, 3/4, full damage, and greater than that damage.
Up to a quarter the total life points (round up), the vessel takes nothing more than cosmetic damage: scratched paint, dents, small holes to hulls or windows…nothing that is immediately harmful.
Between a quarter and half the total life points, the vessel is damaged badly enough that some systems could be effected — fuel lines could be holed, valves blasted open, power lines or hydraulics cut. The effects are felt, but not seriously enough to stop operation of the craft. Check to see what system is hit each time the vehicle take damage in this range to see what systems could be compromised. Check the vessel’s ENDURANCE at Easy (3) and if it fails, apply a -1 die step to the appropriate attribute.
Between half and 3/4 of the life points, the damage is now serious enough to effect two systems at -2 die steps. Check to see which systems are hit, and apply the modifiers.
Over 3/4s but less than full damage, the systems are seriously compromised enough that the vehicle now suffers -2 die step to all attributes, and an ENDURANCE test at Average (7) is made to see if the effected systems fail. This can mean a loss of important function, like propulsion, or simply the loss of something like communications.
Once damage exceeds the total life points, the craft is on borrowed time, and the vehicle is coming apart around the pilot or crew’s ears…the ENDURANCE test Hard (11), but the results of failure are much more severe — the craft will start to come apart around them. The craft is dead and can take no actions. They have one chance to “punch out” in something like a car or a fighter; in a capital ship, the craft takes 2W/round until the craft reached double it’s Life Points, then it has come apart, sank, or otherwise ceased to be a viable transport.
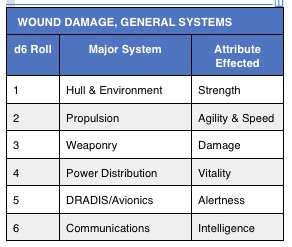
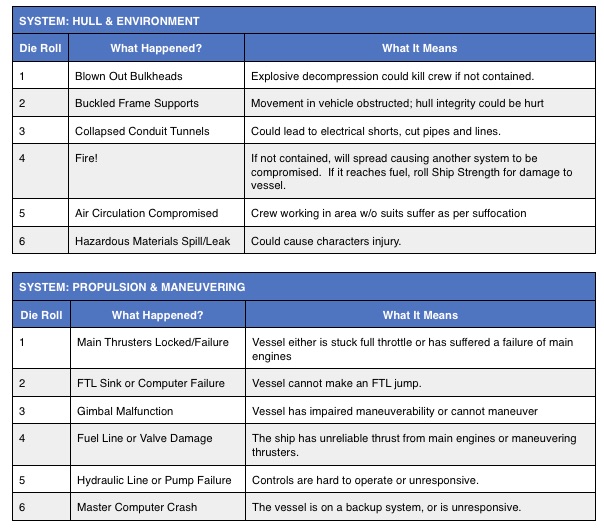
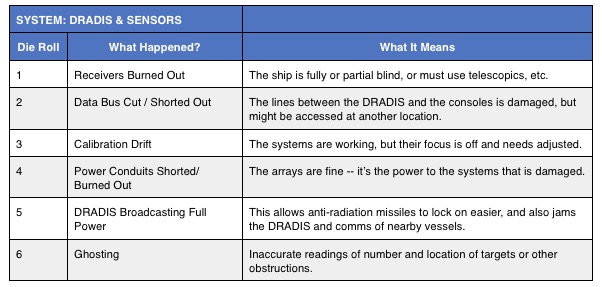
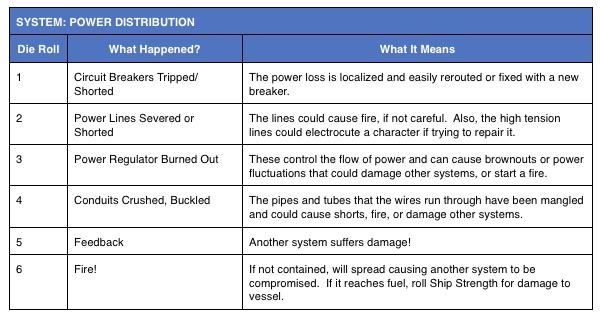
Here are some ways to determine systems that are damaged:
Stun damage is assumed to be minor — blown circuit breakers, crashed computers, cut electrical lines or hydraulic hoses — stuff that can be fixed quickly (in a matter of a round or two) or with jury rigging, if the system can be gotten to.
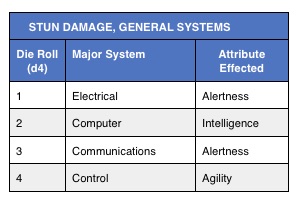
Wound damage is much more serious, and might not be reparable without significant time (longer than a battle, for instance…)
Not crunchy enough..? Here’s a tighter breakdown for you…
Repairing damage is as in the book — you run a repair test against the total number of damage the ship has taken.
These are still a bit rough, but if anyone runs them, or improves on them, let me know how they’re working.

Leave a comment